Simple Pumpkin Activities
From the vibrant color to the odd shapes and textures, kids love to play with pumpkins in the fall! With pumpkins, children can explore almost every sense including sight, touch, smell, and taste!
Science:
- Provide a variety of small pumpkins and gourds along with a magnifying glass. Have children examine the textures, shapes, and colors of the pumpkins and gourds. Have them point out differences and similarities.
- Have the children predict whether a pumpkin will sink or float. Then drop a pumpkin into water to discover that it does float. It is hollow inside and the trapped air keeps it from sinking.
- Explore the inside of a pumpkin to learn more about seeds, fibers, and pumpkin meat. Have the kids feel the stringy texture (this is awesome for sensory play).
- You can even bake the pumpkin seeds and add salt or cinnamon sugar for a unique treat!
Math:
- Guess how many seeds a pumpkin has inside! Collect and count the seeds taken from a cut pumpkin.
- Guess how much a pumpkin weighs, make predictions and then use a scale to determine its weight.
- Cut out several pumpkins ranging in size from small to large. Have the children place the pumpkins in order from smallest to largest. (PRC has 4 sizes of pumpkin die-cuts)
- Have children draw faces on orange colored paper plates only using shapes they have learned about (squares, triangles, rectangles, circles).
Art:
- Pass several pumpkins around the classroom and have the children examine the size, color, shape, and texture of each one. Have them draw detailed pictures of the pumpkins.
- Provide dried pumpkin seeds, glue, and 1-2 inch pieces of orange yarn for children to create their own pumpkin insides.
- Pumpkin Suncatchers-grate pieces of orange crayon and place between 2 pieces of waxed paper. Place a cloth over the paper and iron. Cut out a pumpkin shape and hang in a sunny window.
Bubble Painting
You’ll need:
- Bubble mixture – a commercial mix from a bubble blowing set will work but we’re sure this would also work with a good quality DIY mix
- Food coloring
- Bubble wands
- Cups and/or trays to dip your wands into
- Large sheets of painting paper
Simply tip a little bubble mixture into each tray or cup – one for each color, and then add a little food coloring to each tray and stir gently – you don’t want to make too many bubbles in your cup because bubbles don’t work so well when the mixture is all bubbly. Then it’s time to blow bubbles all over your paper.
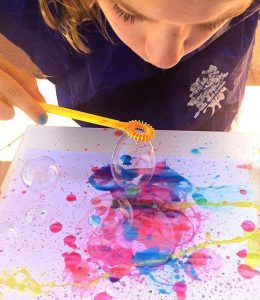
This is a great summer activity to take outdoors (trust us, you’ll want to do this outside or you will probably end up with popped bubble marks all over your walls)! Kids can work on exploring process art as each work will be different and experiment with colors!
Tip 1**Try asking children to predict what colors they can create when they blow two different colored bubbles on the same spot of their paper!
Tip 2**Work on breath control by asking children to blow gently and harder. See what happens to the bubbles when different breath strengths are used!
For more summer activities join us for Summertime Activities on June 6 from 6:30pm-8:30pm. This class is eligible for our BOGO deal*!
*BOGO= Buy One Class, Get One Class Free all summer! Your free class must be taken by August 31, 2017. Call 301-290-0040 to register!
To see all of our classes eligible for BOGO, Click here!
New Years Noise Makers Craft
This is a great craft for children to make before New Years Eve! They will love decorating their plates and getting to make lots of noise with their new creation!
Supplies
Instructions
|