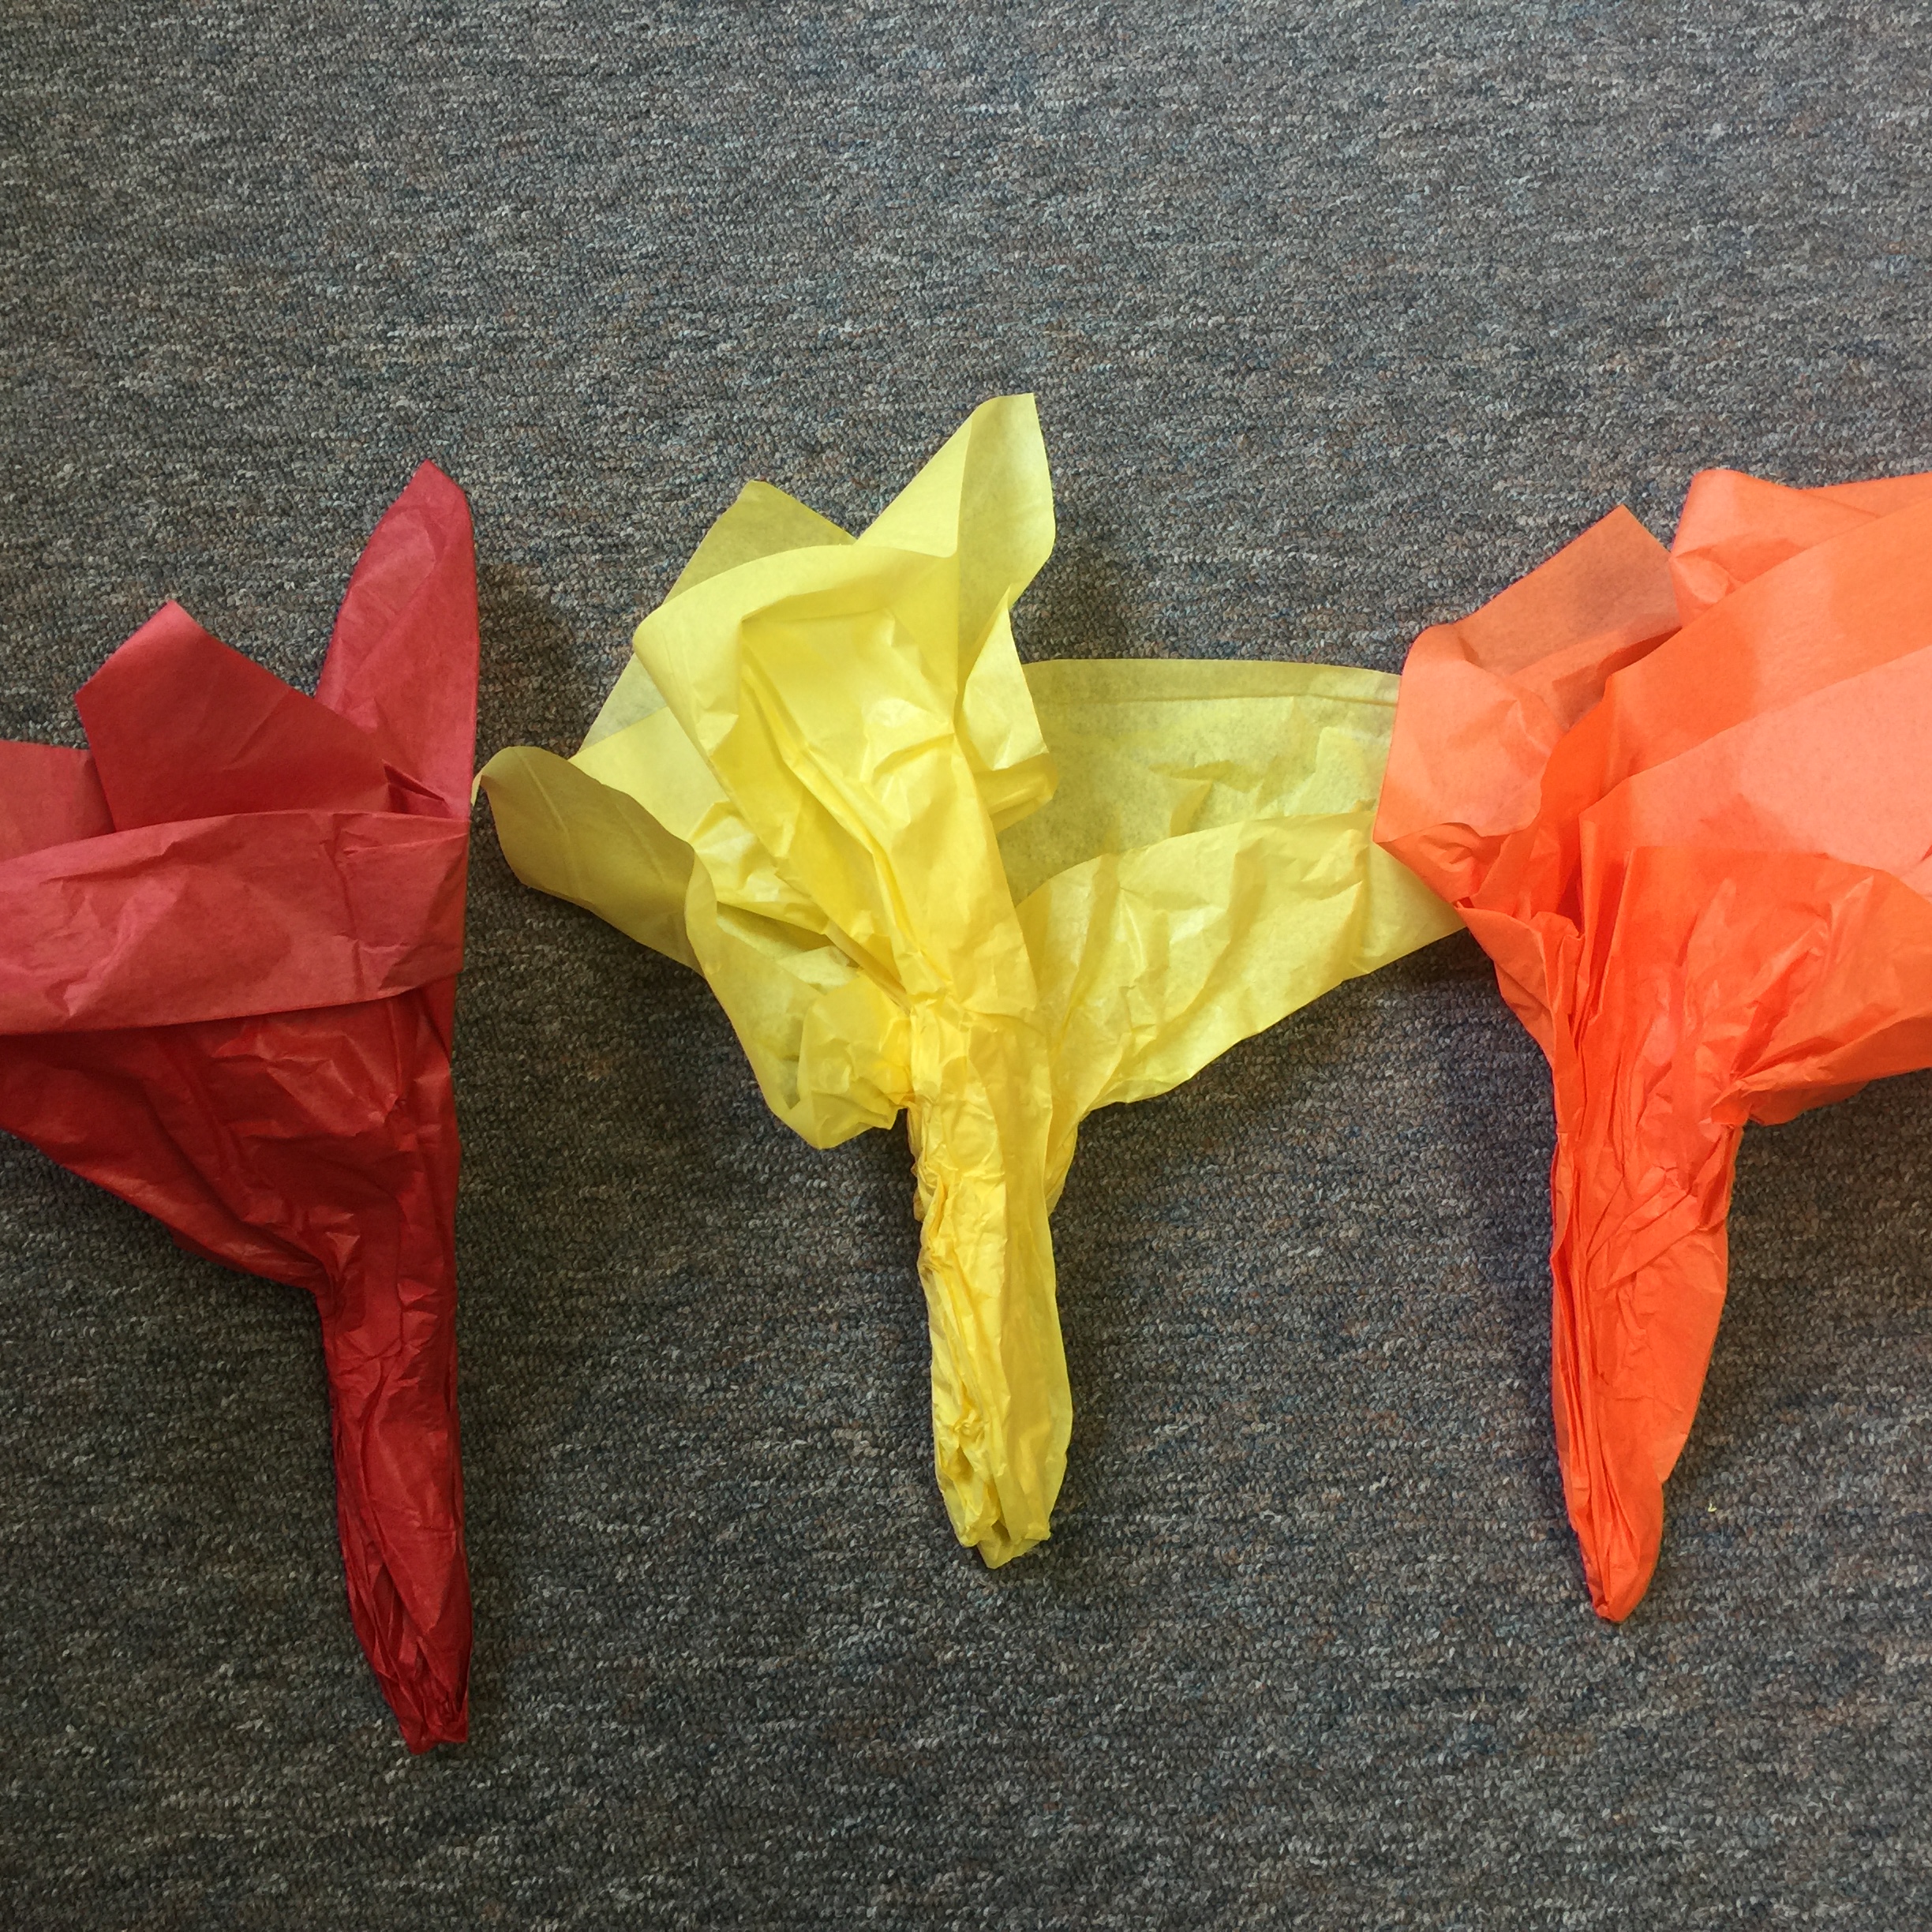
Fall Foliage Mobile

This fall foliage mobile is a beautiful seasonal art project to do with the kids in your care! They’ll love the process art that comes along with mixing paint and shaving cream, and seeing that every leaf comes out different! This is also a great opportunity to get the kids moving by taking them on a scavenger hunt outside to find the sticks needed for the project!

Materials:

  • Shaving Cream
  • Tempera Paint (fall colors)
  • Assorted leaf die-cuts
  • String
  • Stick or Small Branch
  • Paper Plate
  • Spoon
  • Stirrer

Directions:

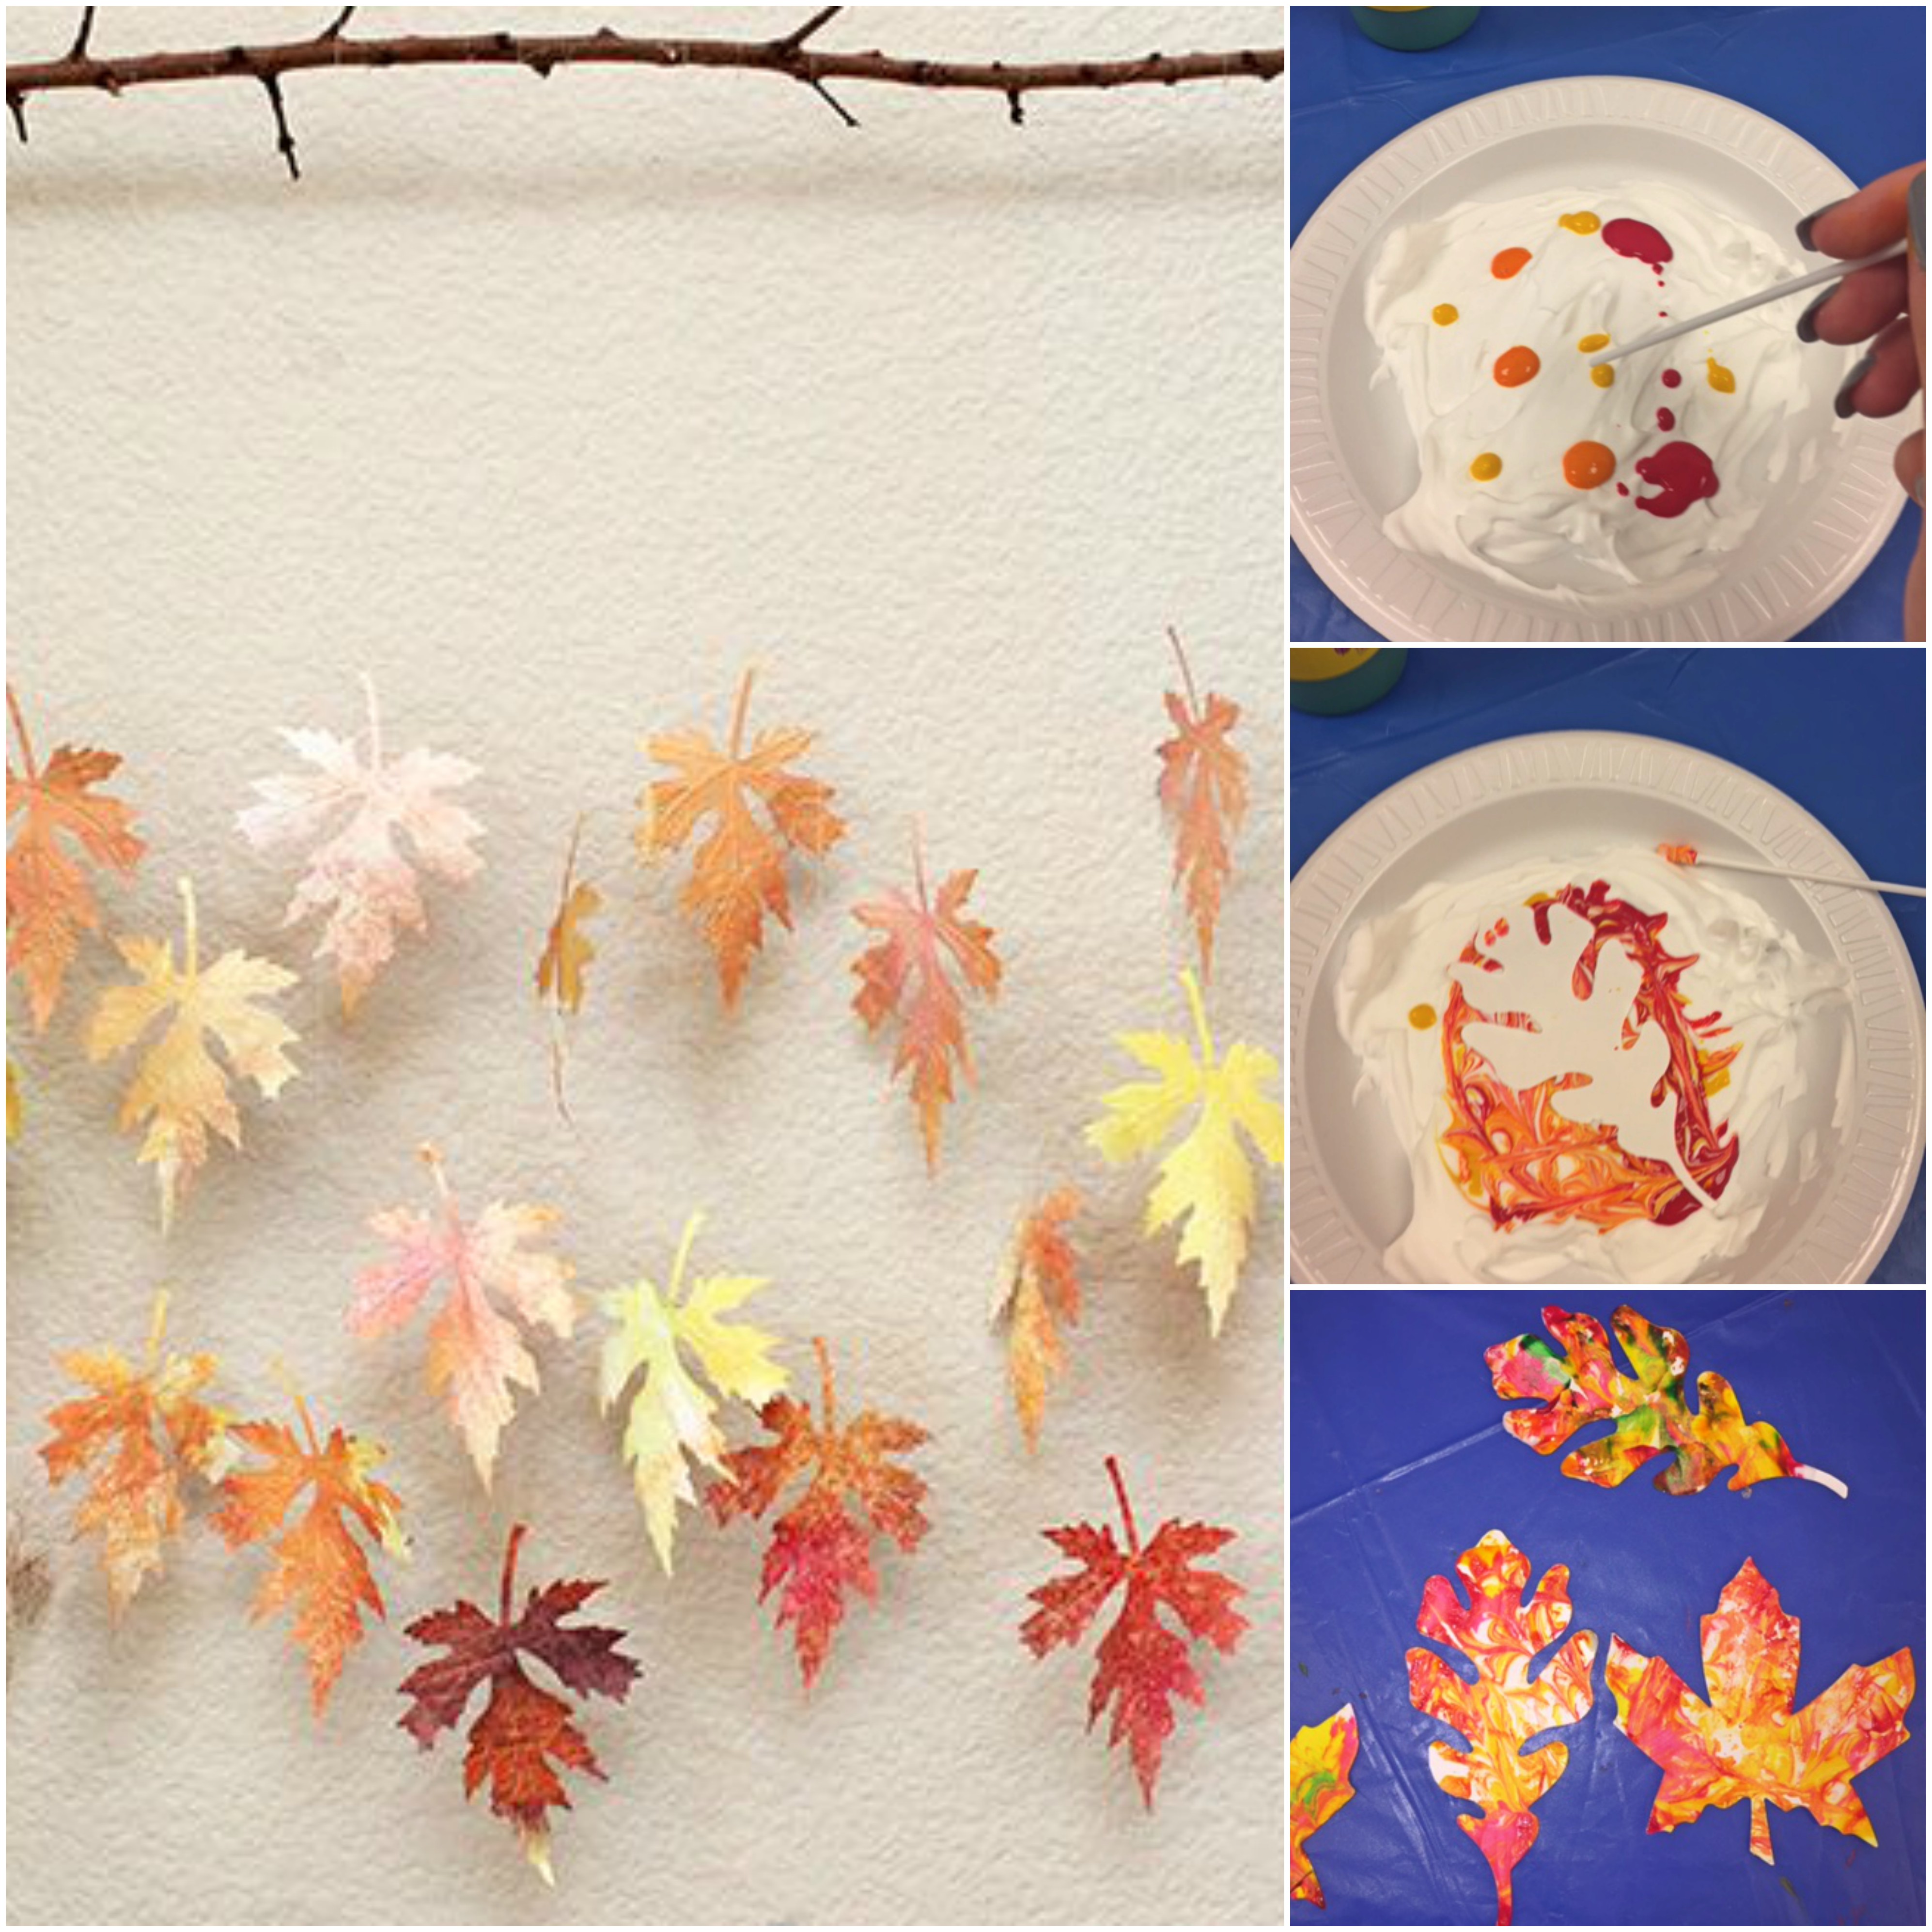
  • Cut shapes of leaves using die-cuts on cardstock paper or cardboard.
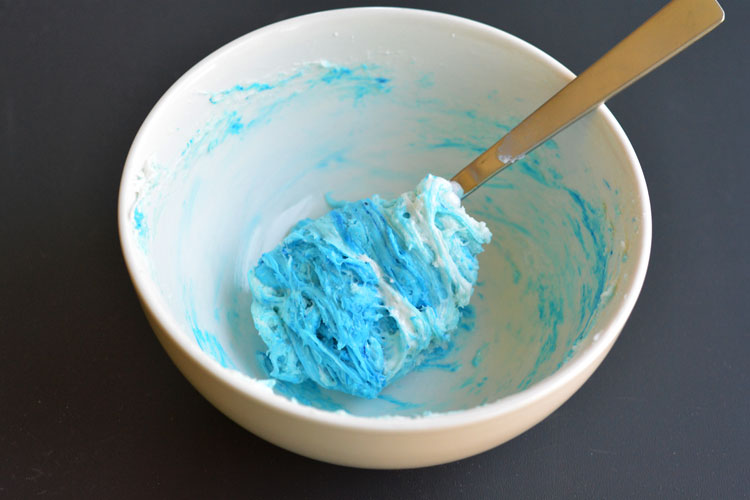
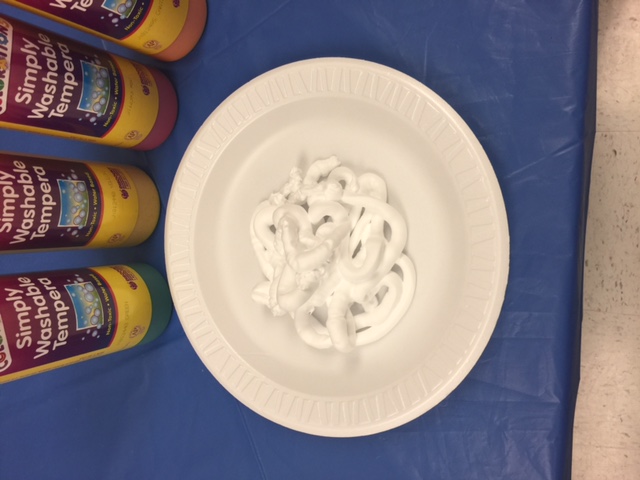
  • Spray medium amount of shaving cream onto paper plate and smooth out with spoon.

img_0950

  • Put a few droplets of each color onto the shaving cream.

img_0955

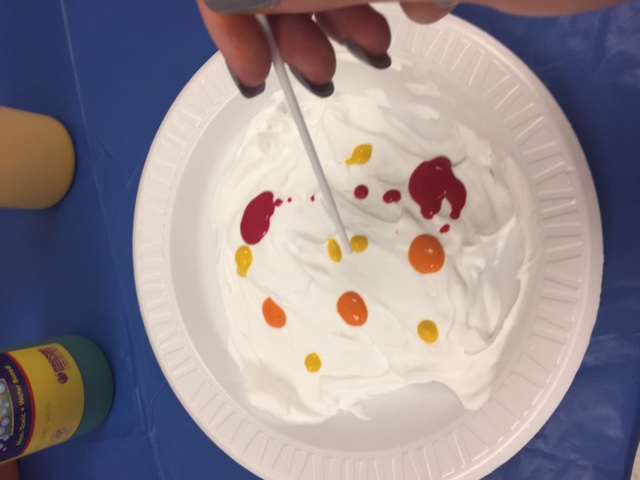
  • Swirl the droplets around with a stirrer or toothpick.

img_0956

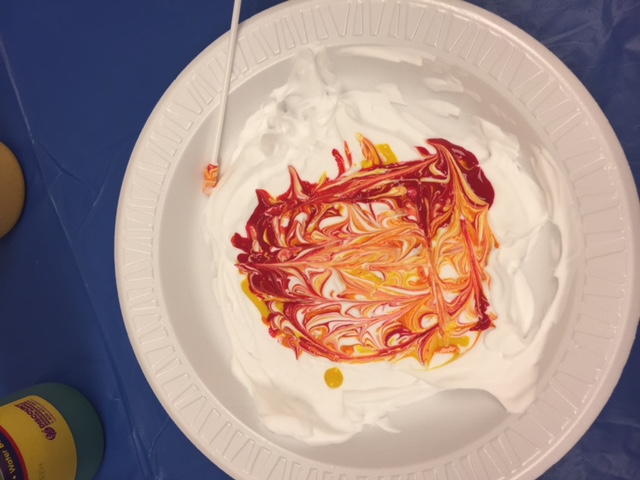
  • Place one leaf face down onto the paint and cream. Make sure to press down all edges.

img_0957

  • Slowly remove the paper from the cream, use your nails or the stirrer to help pick it up.
  • Scrape off the excess shaving cream with the edge of another piece of paper.

img_0959

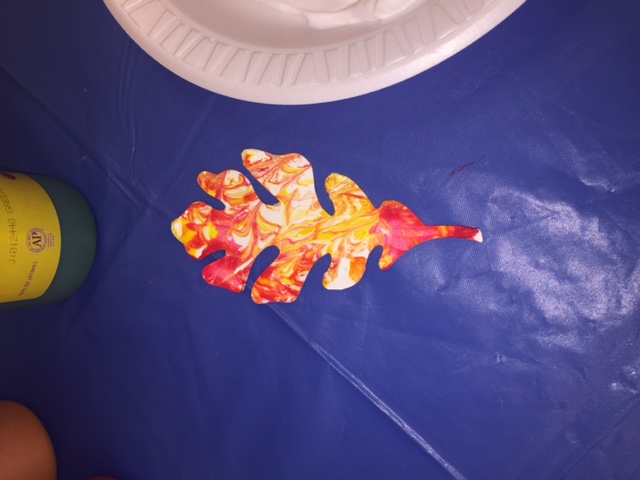
  • Repeat steps by spraying more shaving cream on top of the paint and adding more paint. You should be able to get 2 or 3 leaves out of each layer.
  • Let leaves dry for 1 hour.
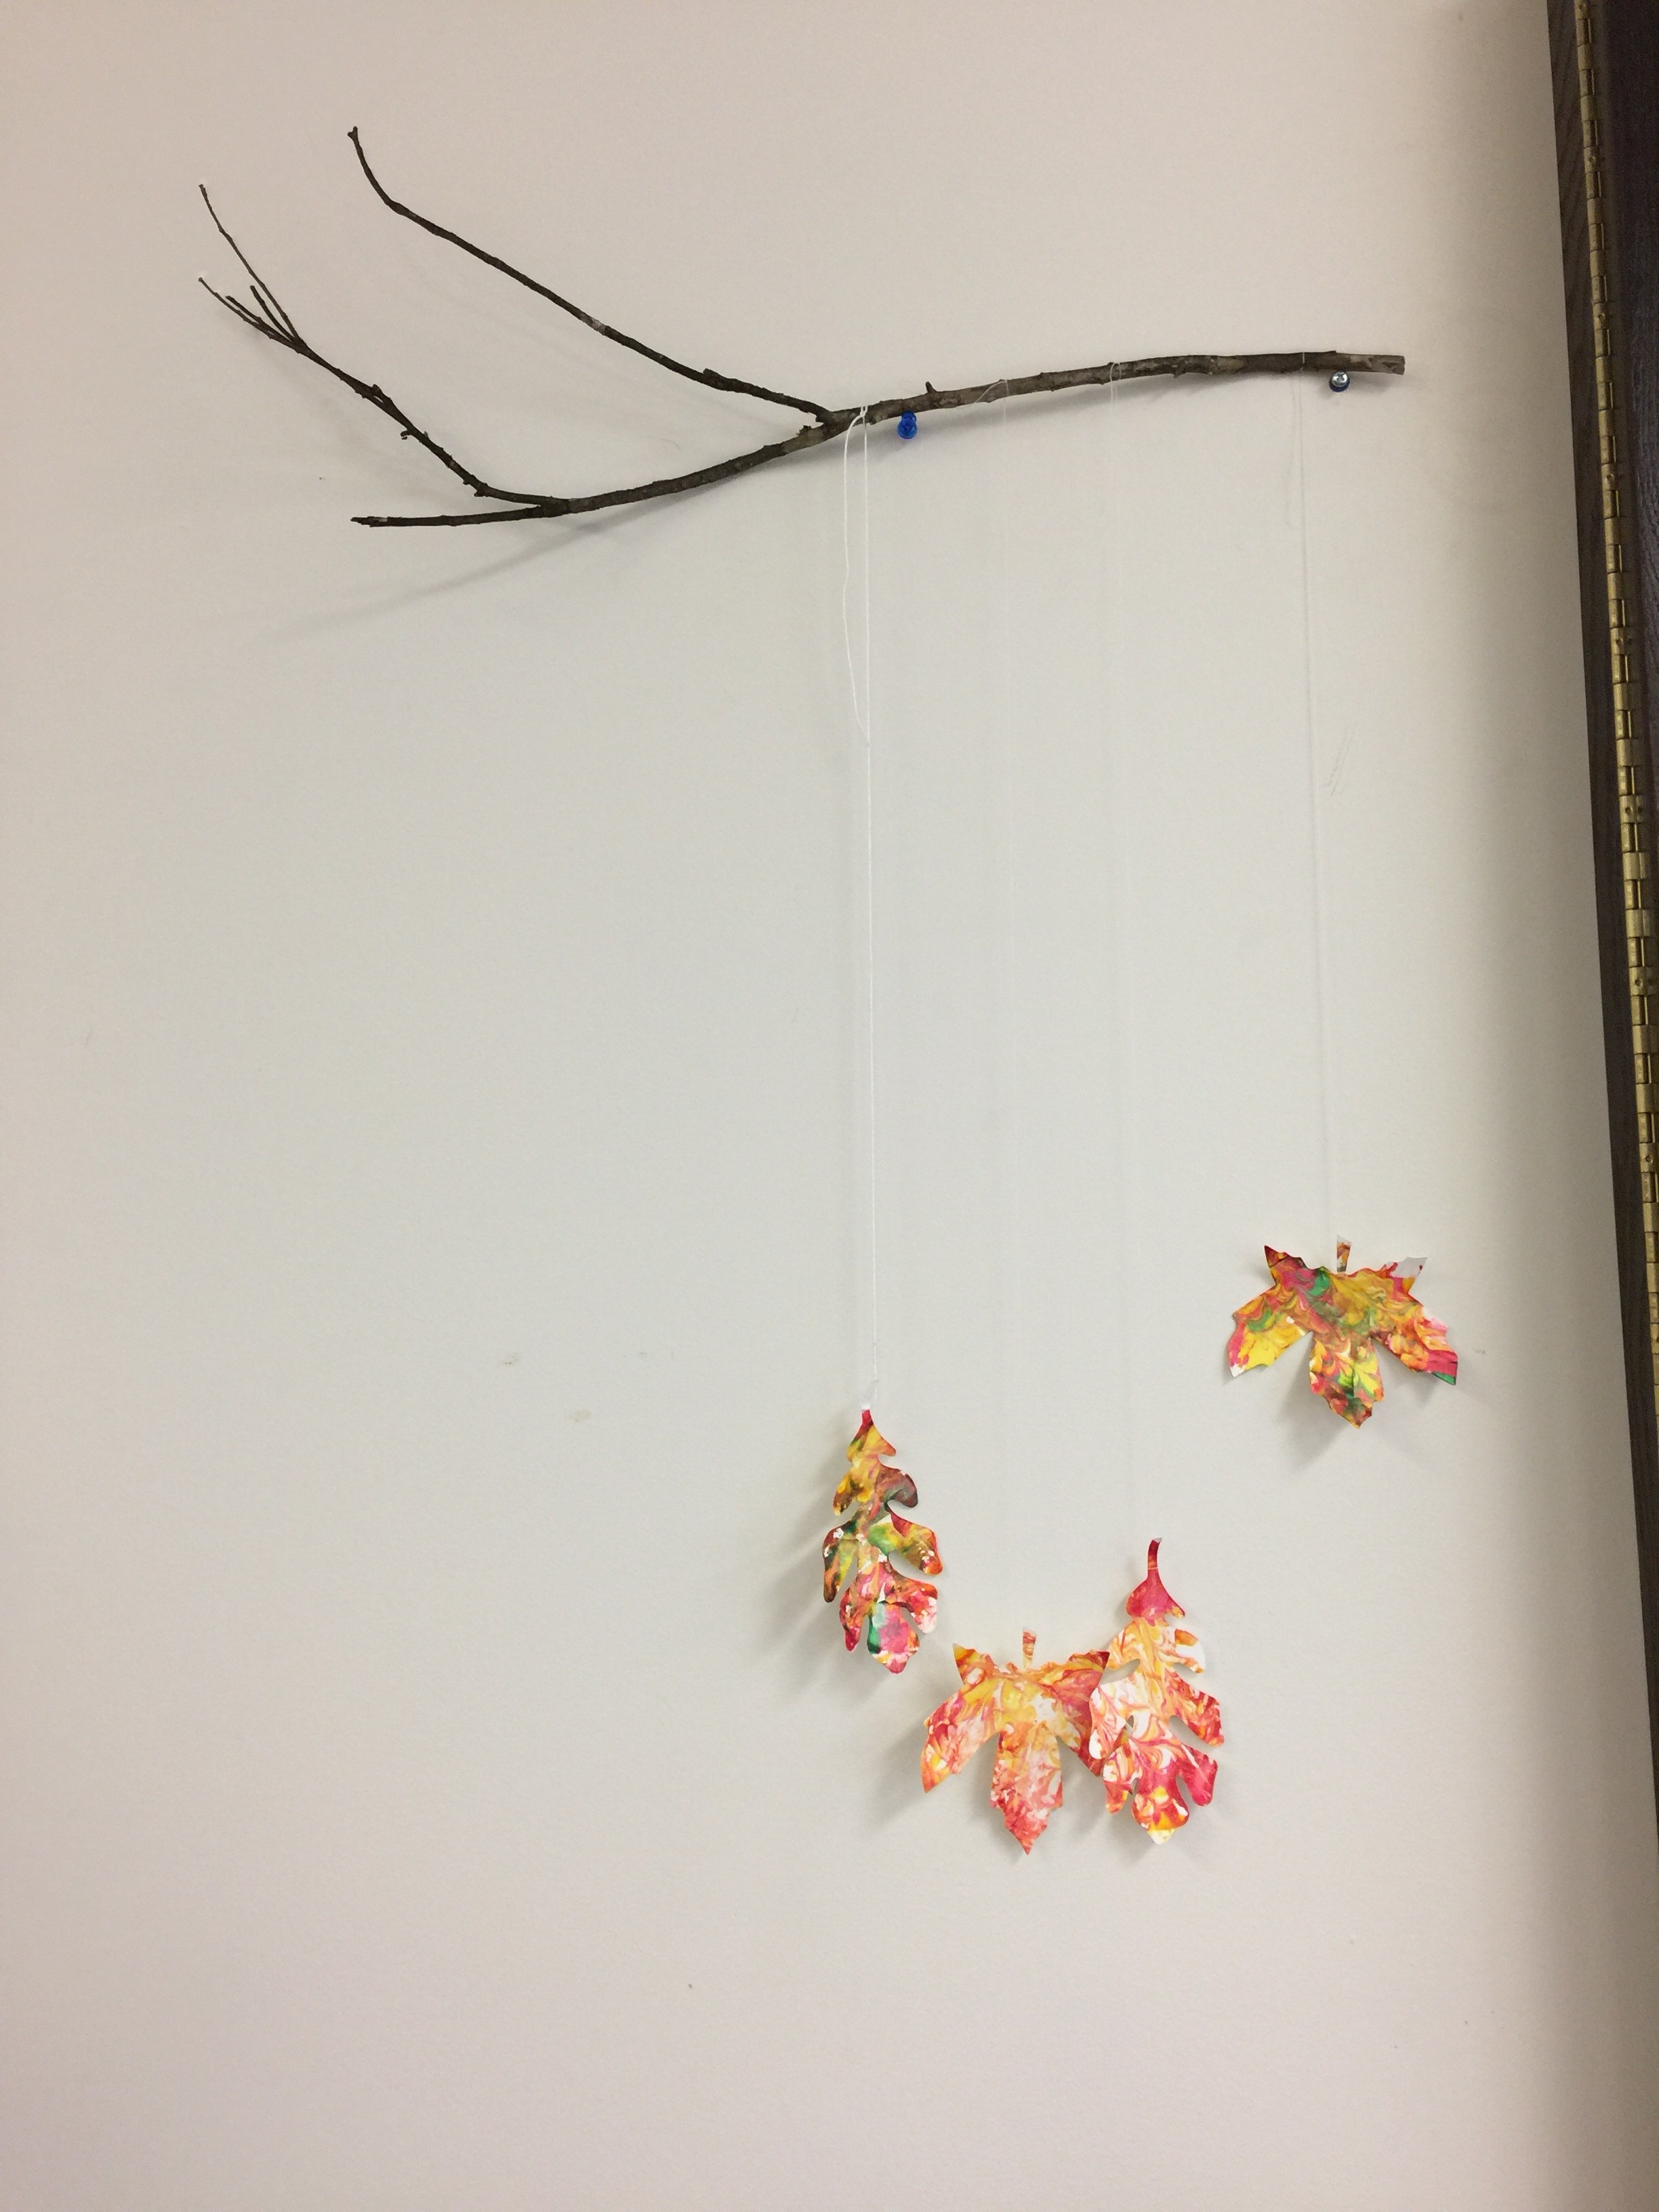
  • Once dry, cut strings for each leaf to different lengths
  • Tie string around the stem of your leaves

img_0967

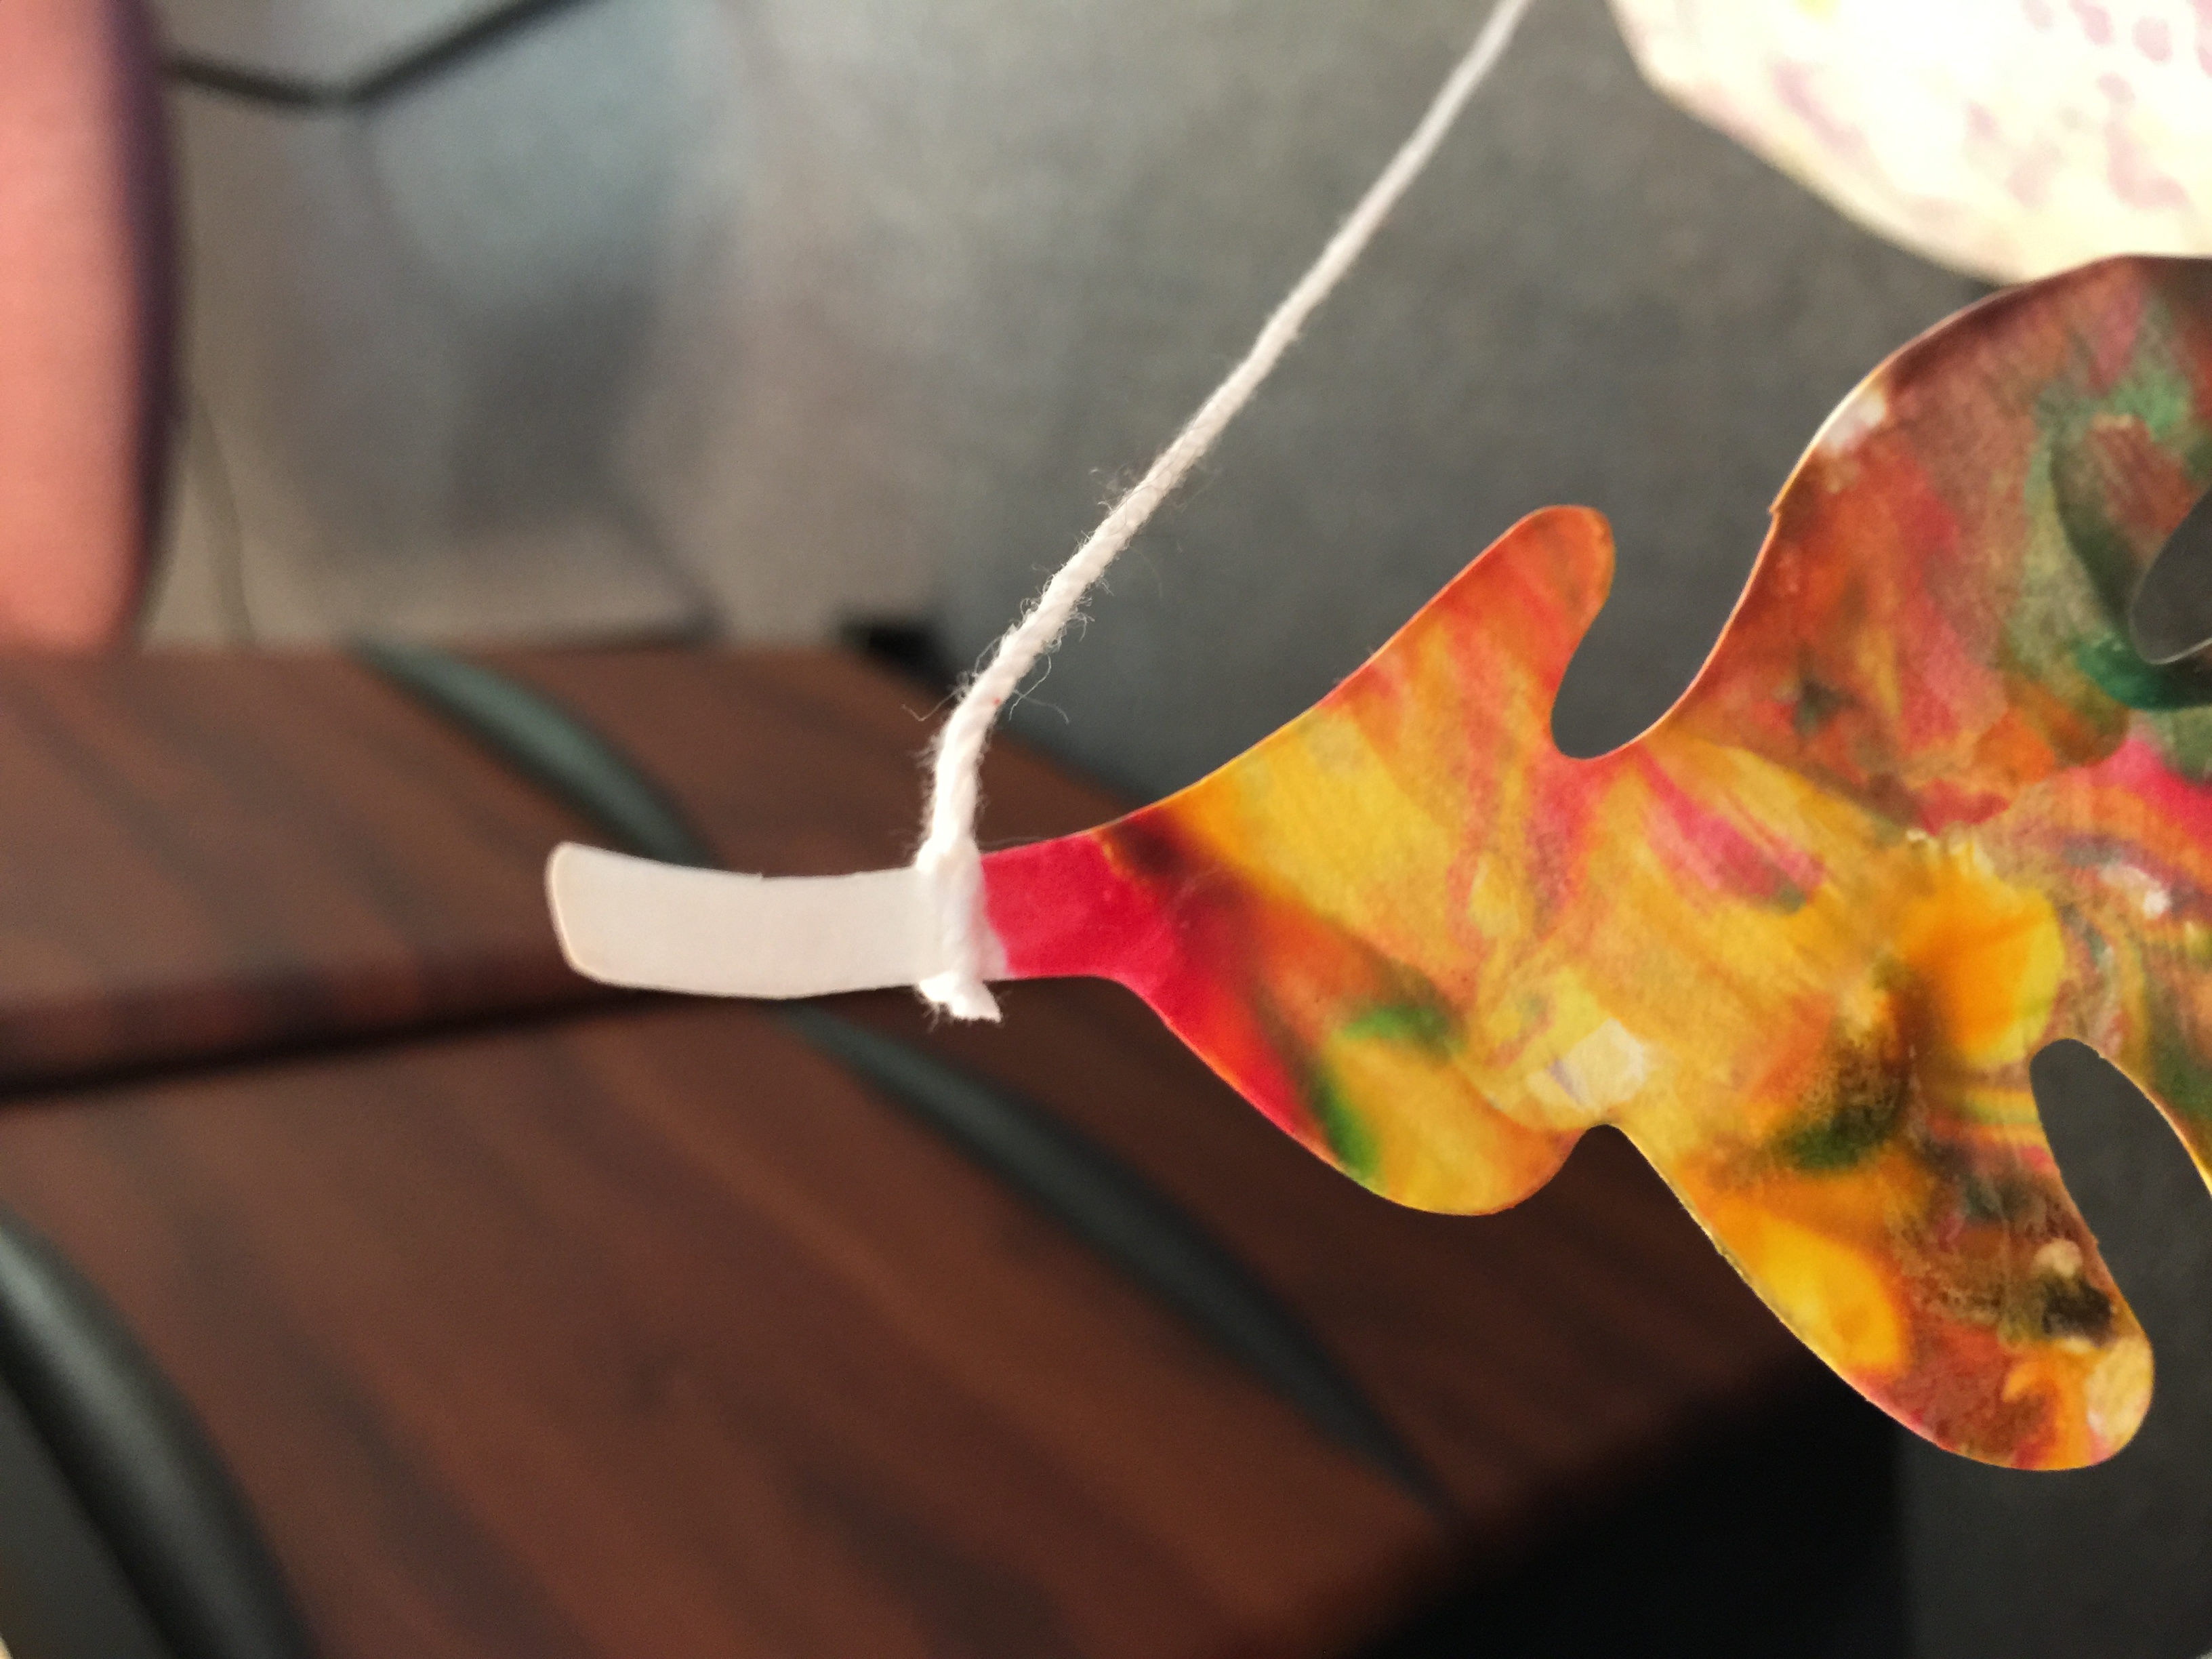
  • Attach each string to a branch or stick.
  • Hang your branch or stick for decoration!

img_0968


befunky-collage

Summer 2016 Keepsake: Sand Handprint

Make these awesome handprint keepsakes using this simple, homemade sand clay recipe for long-lasting memories and sweet gifts. Add shells and treasures collected on beach visits too, to incorporate holiday memories which will last.

HOW TO MAKE  SAND CLAY RECIPE:

2 cups sand

1 1/2 cups plain flour (all purpose)

1 cup warm water

1 1/4 cups salt

Mix together the sand, flour and salt in a large bowl and slowly add the warm water , mixing as you go with a large spoon. This is a dough recipe and as with all doughs, the measurements of dry ingredients can really make a difference to the stickiness/ dryness of the finished dough, so add the water carefully and just balance it out if it feels a little too sticky by adding some more flour or sand.

Once it is all combined, take it out of the bowl and begin to knead it on a lightly floured surface. It will take less than a minute to come together into a soft and pliable ball very similar in feel and consistency to play dough or salt dough.

Proceed to roll, cut and air or oven dry the sand clay in the same way as salt dough from this point forward.


Split the ball into the number of pieces you’ll need(one part for each child) and then roll out the dough one by one, into a circular shape about 2 cm thick. It’s a good idea to roll this directly onto a large baking sheet so that it won’t need to be moved. It is even better to roll it onto baking parchment on the baking sheet if you have it available.

Once the dough is rolled into circles, each child can push their hand into the centre of their piece, make sure to push each finger down firmly, one by one, using another hand on top. Then carefully pull hands off to reveal the handprints in the dough.

Using small shells from beach trips and party craft supplies, decorate around the borders to turn these into real beach keepsakes treasures!

Put them straight into the oven at approximately 250 F  for 4 hours. The sand dough will dry hard at differing times depending on your oven and, importantly, the thickness of the dough discs.

It’s important that they are not too thick or else it takes too long for them to dry hard and they can remain a little doughy in the middle. If you find they are hard on the top but not underneath, take them out and gently turn them over, then put them back into the oven for another hour or two to harden the underside.

You can try adding a clay glaze over the top to seal them and/or make them shiny, but I like the feel and look of them as they are as they seem so realistic!

Sensory Activity: Marshmallow Play Dough

What child wouldn’t love playing with squishy, moldable, and even edible play dough? This is a great tool for sensory exploration and fine motor development! Try using cookie cutters and other molds to make shapes out of the dough, or just make shapes with your hands!

Make Marshmallow Play Dough with the super easy recipe below!

DSC_7338

Ingredients

  • 6 Large Marshmallows
  • ¼ cup Corn Starch
  • 2 tsp coconut oil
  • 12 drops Liquid Food Coloring

Add the marshmallows, corn starch and coconut oil to a microwave safe bowl. Microwave on high for 30 seconds. Then add the food coloring to the marshmallows or the oil. Don’t add it to the corn starch or you’ll have a harder time getting a consistent color when you mix it together. Stir it with a spoon to get all of the ingredients combined. When it gets too hard to stir with a spoon, you’ll need to use your hands to kneed it to finish the job.

DSC_7371

It might be hot from the microwave, so check the temperature before giving it to the kids to kneed. If it’s too sticky and doesn’t combine, try adding another big teaspoon of cornstarch to see if that helps. If it’s still too sticky, add about 1/4 teaspoon of coconut oil, and squish it all together. Play with it on a non stick surface, such as parchment paper taped to the table or a silicone baking mat.

DSC_7545

There you have it! Have fun and remember, this dough is edible–although it doesn’t taste as sweet as you’d think because of the marshmallows. Don’t worry if your child taste tests, they probably won’t eat much.

Olympic Art Activity: Popsicle Stick Gymnast

The U.S. Olympic team is doing great so far this Olympic season! There are still 13 days left to cheer on your favorite athletes! You can start by making this fun gymnastics craft with simple materials you probably already have at home! This project may require help from an adult for the cutting and gluing! Kids can work on fine motor skills by writing and drawing on their gymnast!

Materials Needed:

Popsicle Sticks
Exacto Knife
Thick Paper (like cardstock)
Coloring Utensils (markers, crayons, colored pencils etc)
School Glue
Gynast Leotard Printable (print here)
A Face Photo (See Photos at End of Series)

Instructions:

Start by printing and cutting out the shape of your leotard. Next, cut about a quarter off one end of each popsicle sticks with the Exacto knife. You will generally just need to make an incision on each side with the knife and then use your hands to snap the end piece off. Doing this will ensure that the ends don’t hang too far off the paper.

IMG_0631 (1)  IMG_0647

Next, you’ll want to have your gymnast decorate their leotard! If you have a boy gymnast, cut out a pair of shorts from scrap paper (like the photo above) and have those get decorated as well! For the boy, I cut the bottom portion off of the leotard as well. It might be a good idea to show your little artist some photos of Olympic gymnast’s one pieces so they can get an idea of what they may want theirs to look like. Gymnasts often wear very colorful and vibrant (not to mention sparkly) suits. If you’re up to it, bring out the glitter as well!

IMG_0632   IMG_0649

You can either draw a balance beam close to the bottom of the page or rings from the top OR if you don’t want to attempt drawing, you can print photos and glue them to the cardstock. (It might be a bit harder to find photos that will match the size of your mini gymnast!) I ended up free handing both the beam and the rings.

IMG_0634  IMG_0648

Glue your popsicle sticks onto the paper in the position you’d want your gymnast to be in. Make sure you check to make sure your leotard and/or shorts will cover the ends of the sticks! I put mine upside down to look like she’s doing a flip on the balance beam. The boy version has his arms extended out and legs straight down so his shorts will cover his legs. Glue your leotard and/or shorts to the top of the sticks when you’re ready.

IMG_0635  IMG_0633  IMG_0650

The last steps involve decorating the gymnastics project! Kids can either draw a head or you can help them cut out a photo of the themselves and glue it to the spot where a head would go! Give your child some artistic freedom to draw a background or write some phrases on their sheet!

IMG_0651   IMG_0646


Olympic Art Activity: Olympic Torch

Olympic competitions offer many great lessons to teach young children about sportsmanship! Tonight, all of the Olympic athletes will gather in Rio for the opening ceremonies. There, a burning torch that was originally lit in Greece earlier this year, will be run through the crowd to signal the beginning of the games. To make your very own torch with just a few supplies, follow the instructions below! Kids will work on some gentle fine motor skills when gently wrapping tin foil around an object without tearing it and using tape to secure it. Working with thin tissue paper is also a great way for kids to learn the value of being gentle!

Materials:

Paper towel roll (or 2 toilet paper rolls taped together)
Sheet of tin foil
Clear tape
Red, orange, and yellow tissue paper

Instructions:

Tape your toilet paper rolls together end to end or get your paper towel roll ready.

IMG_0652

Start by wrapping a sheet of tin foil around the cardboard tube. Tuck the end pieces into the holes at either end and use clear tape to hold it on the tube.

IMG_0653

Take your 3 sheets of tissue paper and grab the center of each sheet as if you were going to put them into a gift bag. Twist the center pieces together so they will fit into the top of the tissue roll.

IMG_0736

Stuff the centers of each sheet into the tube and you have created your very own Olympic torch! IMG_0657